
A burning smell from your dryer can signal a real fire hazard, so treat it as urgent, not annoying. Stop the cycle, open the door, pull the clothes out, and cut power at the plug or breaker (shut off the gas supply first on a gas dryer). Get the room ventilated before you do anything else.
Once things are safe, work through the likely causes in order of probability:
- Lint or vent blockage (the most common trigger by far)
- Worn belt, rollers, or bearings creating friction
- A failing heating element or motor drawing too much current
- A melted pen, crayon, or plastic item stuck in the drum
- Normal "break-in" odour on a brand-new machine
Most of these are fixable. A few require a technician. The rest of this guide tells you which is which.
Key takeaways
A burning smell from a dryer is usually caused by lint blocking airflow, but it can also signal a failing belt, motor, or heating element that needs professional attention.
| Point | Details |
|---|---|
| Act immediately | Stop the dryer, unplug it, remove clothes, and ventilate the room before doing anything else. |
| Identify the smell type | Dusty smells point to lint, acrid smells point to electrical faults, rubbery smells point to belts or bearings. |
| Know the red flags | Flames, smoke, sparks, or repeated breaker trips mean call emergency services or a technician, not a restart. |
| Maintain on a schedule | Clean the lint screen every load, vacuum the housing monthly, and get the vent professionally cleared annually. |
| Call in the pros when needed | Clean Vents offers INCV-certified vent clearance with upfront pricing when DIY cleaning doesn't clear the smell. |
Table of Contents
- Why does my dryer smell like burning? Common causes explained
- Immediate safety steps and red flags that mean call for help
- How to troubleshoot a burning smell in your dryer safely
- How to prevent a burning smell from coming back
- When to call a professional for a dryer vent cleaning or repair
- How to inspect and clean the dryer blower wheel
- Steps to check the dryer belt and drum seals for wear
- Tools worth having for dryer cleaning and inspection
- What the conventional advice on dryer smells gets wrong
- Get a professional dryer vent inspection from Clean Vents
- Sources
- FAQ
Why does my dryer smell like burning? Common causes explained
The smell itself is often the fastest clue to what's wrong, before you even open the cabinet.
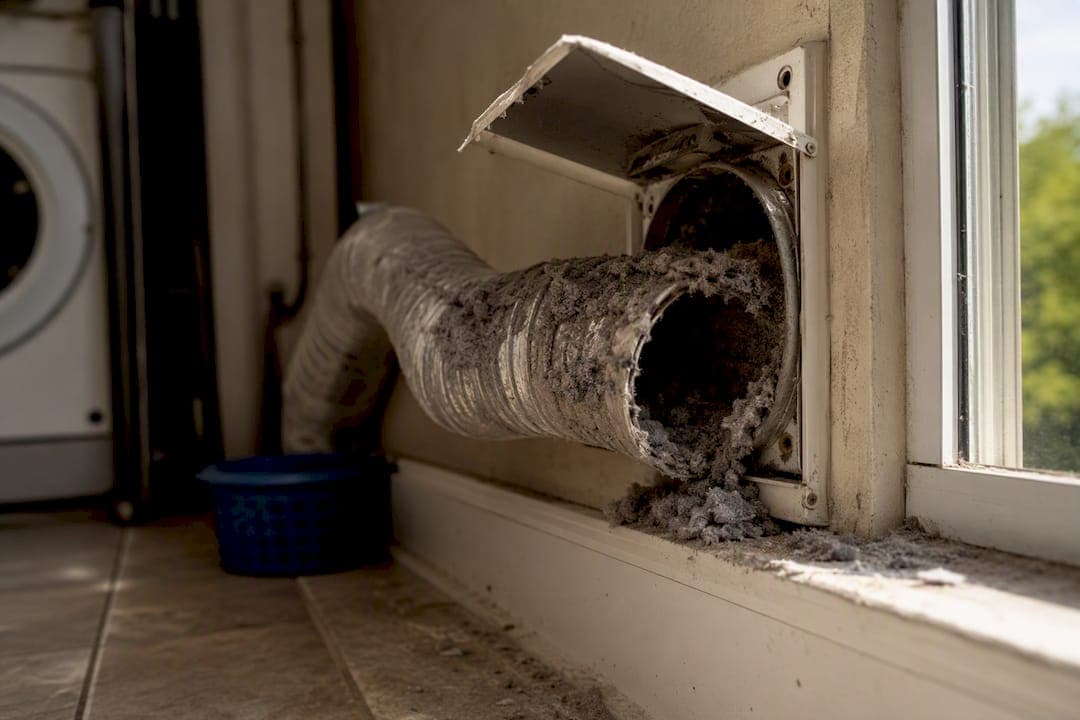
A dusty, smoky, or slightly musty odour paired with clothes that take two cycles to dry usually points to lint. It's built up in the trap housing, the exhaust hose, or the outside vent, and the motor is overheating as it fights against restricted airflow. This is by far the most frequent cause of a burning smell from a dryer, and fire-safety authorities consistently flag it. Failure to clean lint is a documented contributing factor in dryer fires tracked by the USFA, which is the single strongest reason not to shrug this smell off.
Rubbery or hot-plastic odours, especially alongside a squeal or a drum that hesitates before it spins, mean a belt or roller is dragging against a surface it shouldn't be touching. Bearings that have dried out generate friction heat that can scorch nearby plastic and rubber components.
Sharp, acrid, or metallic smells are the ones to take most seriously. That's often the smell of overheating wiring, a shorting heating element, or a motor winding that's breaking down. Tripped breakers, visible sparks, or a scorch mark near the back panel all point the same direction.
A single-cycle chemical or sweet-plastic smell that shows up out of nowhere, with no history of odd noises, usually means something melted. Check pockets before every load. Pens, lighters, hair ties with plastic clasps, and phone cases are repeat offenders.
A mild, short-lived chemical smell on a dryer you just installed is generally normal. Manufacturers note that new units can emit an odour as protective coatings and shipping oils burn off during the first several cycles. LG's support guidance recommends running a few empty cycles to clear it, and Samsung offers similar advice for its own machines. If that smell doesn't fade after four or five runs, stop assuming it's break-in and start troubleshooting.
Pro Tip: Smell the exhaust air at the outside vent opening, not just inside the drum. If the burning smell is stronger outdoors than at the lint trap, the blockage is further down the duct than you think.
Appliance-repair professionals list lint buildup, worn belts and rollers, and heating-element or motor faults as the three most common root causes across service calls, which lines up with what most homeowners find once they open the cabinet.

Immediate safety steps and red flags that mean call for help
Follow this order every time, no matter what you suspect caused the smell:
- Stop the dryer immediately and unplug it, or shut the breaker if it's hard-wired.
- Open the door and pull out all clothing, checking for scorched or melted fabric.
- Ventilate the room by opening a window or turning on an exhaust fan.
- For gas dryers, shut off the gas supply at the valve before doing anything else.
- Leave hard-wired units powered down and call a qualified technician before restoring power.
Pro Tip: Never restart the dryer to "see if the smell is still there." Reintroducing power to a component that's already overheated is how a smell turns into a fire.
Some signs mean this stops being a DIY project entirely. Call emergency services or a certified appliance technician right away if you see any of the following:
- Visible flames or glowing embers anywhere in or around the machine
- Persistent smoke that doesn't clear once the dryer is off and unplugged
- Visible sparks near the plug, cord, or back panel
- Scorch marks on the cabinet, cord, or wall behind the dryer
- Breakers that trip repeatedly when you try to restore power
If you're not sure whether what you're seeing qualifies, treat it as a yes. Asurion's troubleshooting guidance is blunt about this: cut power, clear the space, and get a professional's eyes on anything that looks electrical before you touch it again.
How to troubleshoot a burning smell in your dryer safely
Once the dryer is off, unplugged, and the room is ventilated, work through these checks in order.
- Clean the lint trap and its housing. Pull the screen and vacuum inside the slot it sits in, not just the screen itself. Lint packs into that housing over time and creates a bypass where air (and heat) escapes around the trap instead of through it, which is part of why "I clean the lint trap every load" doesn't always prevent overheating.
- Disconnect and inspect the exhaust hose. Look for kinks, crushed sections, or a solid lint plug where the hose meets the wall. Check the exterior vent cap outside for bird nests, spider webs, or a stuck damper flap.
- Inspect the drum for foreign objects. Run a hand along the drum interior (with the machine unplugged) to feel for melted plastic or metal buttons that have fused to the surface.
- Check the plug, cord, and outlet. Look for discolouration, melting, or burn marks on the prongs and the outlet face. If you find any, stop. Do not attempt internal electrical repairs yourself; call a technician.
- Listen before you touch anything else. Grinding, squealing, or a drum that stalls under light resistance, combined with a rubbery smell, usually points to a worn belt, roller, or motor bearing that needs professional replacement.
A few notes on scope. If your vent run is long, goes through the roof, or has multiple bends, a household vacuum and a flexible brush won't reach the blockage. That's a job better suited to a roof-exit vent cleaning or a service built for long dryer vent runs. If you find animal nesting material in the vent cap, don't just pull it out and reassemble. Check what to do about a bird nest in a dryer vent, since debris often extends further into the duct than what's visible from outside.
None of these DIY steps apply to the heating element, motor windings, or internal wiring. Those repairs involve components that can carry live current even when the machine appears off, and they belong to a technician.
How to prevent a burning smell from coming back
Prevention here is mostly a scheduling problem, not a skill problem.
Every load: clean the lint screen before you start the dryer, not after. A screen coated in lint from the previous cycle blocks airflow from the first minute of the new one.
Monthly: vacuum the lint trap housing and check the exterior vent outlet for a clear flap and no visible lint clumping around the opening.
Annually, or sooner if drying times climb: get the full vent run professionally cleaned. Repair specialists note that vent cleaning meaningfully cuts fire risk, and it's especially worth prioritizing if you live in a condo with a shared exhaust duct, or if your vent run is long with multiple bends where DIY brushes can't reach.
A few habits reduce strain on the whole system:
- Don't overload the drum; dense loads trap heat and lint together
- Check pockets before every load (lighters and pens are repeat culprits)
- Match heat settings to fabric type instead of defaulting to "high" for everything
- Keep at least a few centimetres of clearance behind and beside the dryer for airflow
Keep the exterior vent cap and damper in good condition too. A damaged flap that won't close lets moisture and pests back into the duct, which sets up the next blockage.
When to call a professional for a dryer vent cleaning or repair
Some situations are worth a service call the first time, not after three failed DIY attempts:
- The burning smell persists after you've cleaned the lint trap and vent yourself
- You see visible damage to wiring, the cord, or the outlet
- You're getting electrical symptoms like sparking or repeated breaker trips
- The vent run is long, goes through a roof, or serves a shared condo duct
- Mechanical noise (grinding, squealing) accompanies the smell
A proper professional visit typically includes full vent clearance from the drum inlet to the exterior outlet, vacuuming inside the dryer cabinet itself, a visual inspection near the motor and heating area, and a written note on anything that needs replacing.
Clean Vents technicians work to INCV certification standards, quote a flat rate upfront before the work starts, and back the job with a satisfaction guarantee. Before booking anyone, ask three questions: what's included in the scope (cabinet and vent, or vent only), what the total price is before they arrive, and what certification the technician holds.
Pro Tip: Ask whether the service includes an inlet to outlet check. Some cheaper cleanings only clear the accessible hose section and skip the harder to reach exterior ductwork, which is where blockages usually sit.
How to inspect and clean the dryer blower wheel
The blower wheel is the small fan, usually plastic, that pushes air through the drum and out the exhaust. It sits behind the drum and isn't visible without removing the back panel, so this check sits at the edge of what most homeowners should attempt themselves.
Lint wraps around the blower wheel's blades and hub over time, especially if the lint trap has been neglected for months. That buildup unbalances the wheel, forces the motor to work harder, and can generate the kind of hot-plastic smell that mimics a belt problem.
If you're comfortable removing the back panel (unplug the dryer first, always), look for lint packed around the blade edges and the shaft where the wheel meets the motor. Clear it gently with a soft brush rather than scraping, since cracked plastic blades need replacing, not cleaning. If the wheel wobbles or the shaft feels loose when you turn it by hand, that's a bearing or mounting issue, not a lint issue, and it calls for a technician.
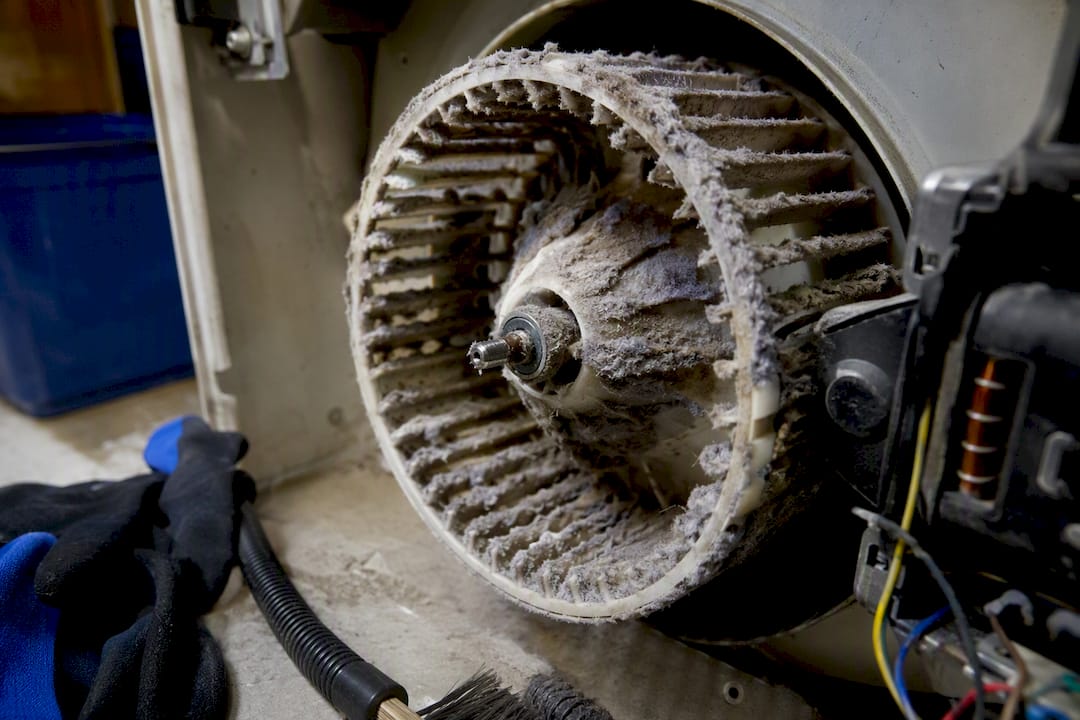
Given how many wires and panels sit between you and the blower wheel, this is one of the checks where hiring a professional is often faster and safer than a first attempt on your own.
Steps to check the dryer belt and drum seals for wear
The drive belt loops around the drum and connects to the motor pulley, and it's a common source of both burning smells and grinding noises when it wears out.
With the dryer unplugged and the top or front panel removed (check your model's service access point), look at the belt for cracking, glazing, or fraying along its edges. A belt that's stretched will look shiny and slightly loose rather than taut. Spin the drum by hand. It should turn smoothly with light, even resistance; grinding or catching means the belt or a roller underneath it is failing.
Drum seals sit at the front and back where the drum meets the cabinet, and they keep hot air contained instead of leaking around the drum's edges. Worn seals often look frayed, flattened, or scorched, and they'll let heat escape near the front panel, sometimes producing a faint burning smell without any grinding noise at all.
Neither the belt nor the seals are usually a simple swap. Both require partial disassembly of the drum housing, and reassembling a drum incorrectly can throw it out of balance. If you spot wear on either component, that's a call for a technician rather than a weekend project.
Tools worth having for dryer cleaning and inspection
A few inexpensive tools cover most of the DIY checks above. A flexible lint brush with a long, bendable handle reaches further into the vent hose than fingers or a vacuum nozzle alone. A shop vacuum with a narrow crevice attachment clears the lint trap housing far more thoroughly than the trap alone.
For the exterior vent, a dryer vent cleaning kit that pairs a rotating brush head with drill attachment cuts through packed lint in a straight hose run. It won't help much with a vent that has multiple 90 degree bends or a roof exit. That's the point where a kit stops being useful and a professional with proper ducting tools takes over.
A basic multimeter is handy if you're comfortable checking whether an outlet is delivering power, but leave any testing of internal wiring or the heating element to a licensed technician. Keep a small flashlight or headlamp nearby too. Most of what you're looking for, scorch marks, melted plastic, frayed belts, hides in the dimmest part of the cabinet.
What the conventional advice on dryer smells gets wrong
Most guidance on this topic treats "clean your lint trap" as the whole answer, and that's where it falls short. The lint trap catches maybe a fraction of what a dryer sheds each cycle. The rest works its way into the housing, the hose, and the exterior duct, places a screen was never designed to reach. Homeowners who clean the trap religiously still get overheating because the real blockage sits somewhere they've never looked.
The bigger gap is in how people read urgency. A mild chemical smell on a two-week-old machine and a sharp electrical smell on a ten-year-old machine get treated the same way, with a shrug and a hope it goes away. They shouldn't. One is a manufacturer-acknowledged break-in phase. The other is a component failing in real time.
If there's one priority worth taking from all of this, it's stop treating "the smell went away" as proof the problem is solved. Airflow restriction and worn parts both tend to recur quietly before they announce themselves loudly.
Get a professional dryer vent inspection from Clean Vents
If your dryer keeps drying slowly, tripping breakers, or giving off a faint burning smell even after you've cleaned the lint trap yourself, the issue is very likely sitting somewhere in the vent run you can't reach with a household vacuum. That's the gap Clean Vents exists to close: a full inlet-to-outlet clearance instead of a partial trap cleaning, done by INCV-certified technicians at a flat rate you know before the job starts.

This fits homeowners, landlords, and property managers dealing with long vent runs, roof exits, or shared condo ducts, exactly the situations where DIY brushes and kits stop being enough. Clean Vents backs every job with a satisfaction guarantee, so you're not left guessing whether the smell will come back next month. If you're in Laval or the surrounding area and the smell hasn't fully cleared, book a dryer vent cleaning service or start with a free quote through Clean Vents to get a technician's eyes on the problem before it becomes a bigger one.
Sources
- USFA — appliance and electrical fire prevention
- Asurion — Burning smell coming from your dryer? Here’s how to fix it
- EasyBear — Dryer burning smell guide
- LG Dryer A burning smell comes from the dryer during drying
FAQ
Where do most dryer fires start?
Most dryer fires start in lint that has accumulated in the trap housing, exhaust hose, or exterior vent, where it restricts airflow and lets heat build up around the drum and motor.
How do I get the smoke smell out of my dryer?
Clean the lint trap and housing thoroughly, then run one or two empty cycles with the door open afterward to air out residual smoke odour; if the smell persists, have the vent professionally inspected.
My dryer smells like burning but it's not spinning. What could be causing this?
A dryer that smells like burning but won't spin often points to a broken belt, a jammed drum roller, or a motor that's overheating and shutting down as a safety measure, all of which need a technician's inspection.
What does an overheating dryer smell like?
An overheating dryer usually smells dusty or smoky if the cause is a blocked vent, or sharp and acrid if the heating element or motor is the source of the heat.
Is a burning smell normal for a new dryer?
A mild, short-lived chemical smell is normal on a new dryer as factory coatings and shipping oils burn off, but it should fade within four or five cycles; if it doesn't, treat it as a fault, not a break-in phase.