
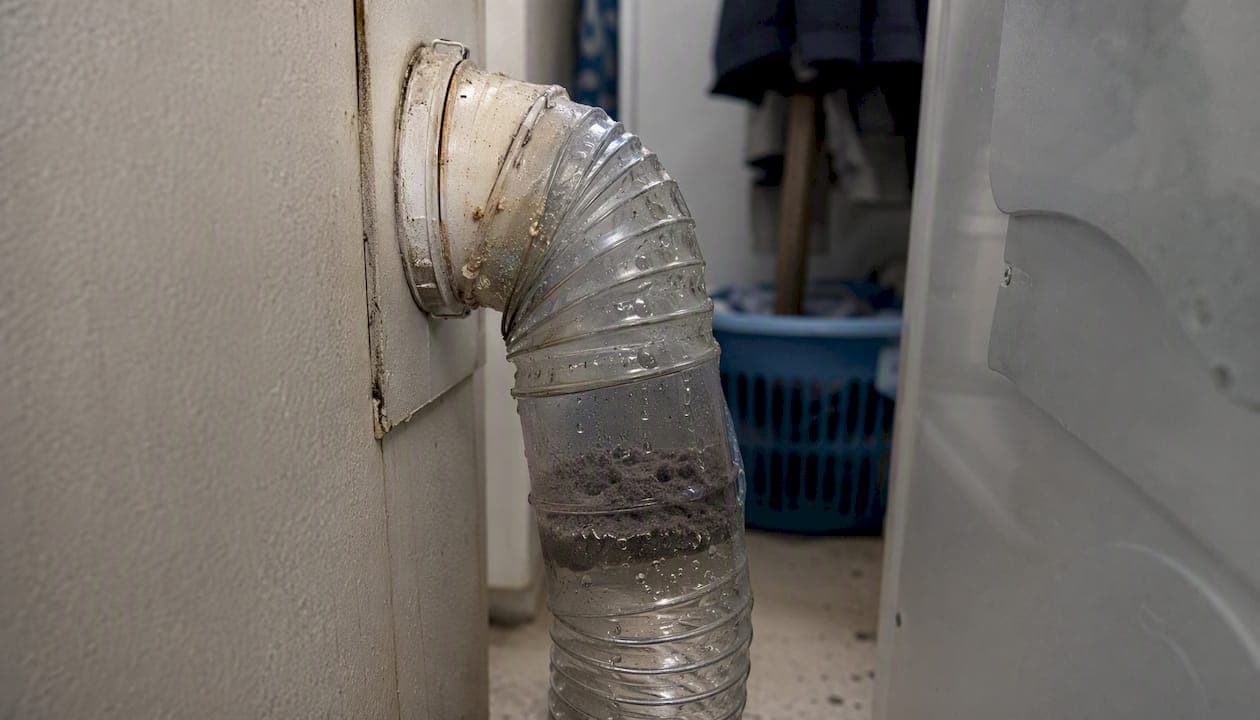
Stop the dryer. That is the single most important thing to do if you suspect water in your dryer vent, particularly with a gas model. Water or condensation inside a dryer duct is never normal — it signals that exhaust airflow is failing, cooling before it exits, or that outside moisture is getting in. Left alone, it leads to mould, structural damage, and a real fire risk from wet, compacted lint.
Here is what to do right now:
- Stop running the dryer until you have inspected and cleared the vent, especially if it is a gas dryer (blocked vents can cause carbon monoxide backflow).
- Check the exterior vent flap from outside — it should open freely during a cycle and close tightly when the dryer is off.
- Remove any standing water you can safely reach using a wet/dry vacuum before running the dryer again.
Pro Tip: For gas dryers, shut off the gas supply at the valve behind the unit before any inspection. Ventilate the area and do not re-light the dryer until the vent is confirmed clear.
GE Appliances confirms that water accumulation in dryer vents commonly points to obstructions, incorrect slope, a damaged exterior flapper, or condensation on cold, uninsulated ductwork. None of those causes fix themselves. The sections below walk you through diagnosis, DIY cleaning, permanent fixes, and the clear signals that it is time to call a certified professional like Clean Vents, whose INCV-certified (Institut des Nettoyeurs de Conduits de Ventilation) technicians handle exactly these situations across Laval and the surrounding area.
Key takeaways
Water in a dryer vent signals a ventilation failure — clogged lint, incorrect slope, uninsulated cold-space runs, or a damaged exterior hood — and every one of those causes requires a specific fix, not just a wipe-down.
| Point | Details |
|---|---|
| Stop the dryer immediately | Do not run the dryer again until the vent is inspected, especially with a gas model. |
| Most common cause | Lint clogs and poor airflow trap humid exhaust, which cools and condenses inside the duct. |
| Top permanent fix | Replace flexible plastic duct with rigid smooth metal and insulate runs through cold spaces. |
| Slope matters | A continuous slight slope toward the exterior lets condensate drain out instead of pooling. |
| Clean Vents | INCV-certified technicians serving Laval and surrounding areas, with flat-rate pricing and a satisfaction guarantee. |
Table of Contents
- Why does water collect in a dryer vent?
- What happens if you leave water in the vent?
- How to inspect your dryer vent: a step-by-step checklist
- How to remove water and clean the duct yourself
- Permanent fixes that stop condensation from coming back
- When should you hire a professional dryer-vent cleaner?
- How Clean Vents inspects and cleans dryer vents
- The part most guides get wrong about dryer vent water
- Professional dryer-vent cleaning in Laval and surrounding areas
- Sources
- FAQ
Why does water collect in a dryer vent?
Poor ventilation — clogged, blocked, or torn ductwork and blocked exterior vents — is the most common reason moisture builds up inside a dryer duct. When hot, humid exhaust air slows down or cools before it exits the house, it drops its moisture inside the duct instead of carrying it outside. Several specific conditions cause this:
- Lint and debris clogs: Accumulated lint narrows the duct, slows airflow, and gives condensation a surface to cling to.
- Incorrect vent slope or sagging flex duct: A duct that sags or slopes back toward the dryer pools condensate rather than draining it toward the exterior.
- Long runs with multiple bends: A vent run that is long, curvy, or has sharp bends slows exhaust flow and increases the chance that humid air cools and condenses inside the duct before it exits.
- Uninsulated ductwork through cold spaces: In Canadian winters, a duct running through an unheated attic, garage, or crawl space chills rapidly. The dew point effect kicks in and condensation forms on the duct walls.
- Damaged or stuck exterior vent flapper: A stuck, damaged, or wrong-size exterior hood can either block exhaust (causing moisture backup) or let rainwater and pests in.
- Venting into interior spaces: Some older homes or DIY installations vent the dryer into a wall cavity, attic, or basement. This is unsafe and violates manufacturer guidance — it causes mould, structural rot, and carbon monoxide hazards with gas dryers.
| Cause | What happens | Urgency |
|---|---|---|
| Lint clog | Airflow slows, condensate builds, fire risk rises | High |
| Incorrect slope / sagging duct | Water pools inside duct or returns to dryer | High |
| Long run with bends | Exhaust cools mid-run, condensation forms | Medium |
| Uninsulated duct in cold space | Dew point effect, recurring condensation | Medium |
| Damaged exterior flapper | Rain ingress or exhaust blockage | High |
| Interior venting | Mould, CO risk, code violation | Critical |
What happens if you leave water in the vent?
The risks compound quickly. A damp duct is not just an efficiency problem.
Mould and structural damage are the first consequences most homeowners notice — water stains on walls or ceilings near the duct run, a musty smell from the laundry area, or visible mould at the dryer outlet. Prolonged moisture accelerates corrosion in metal ducts and causes rot in wood framing around concealed duct runs. If water damage has already spread beyond the duct itself, professional mould remediation may be needed before repairs can proceed.
Fire risk increases when wet lint compacts into a dense, slow-drying clog. Wet, compacted lint narrows the duct and raises drying temperatures inside the drum. The U.S. Fire Administration has identified clogged dryer vents as a leading factor in residential dryer fires — a pattern that applies equally to Canadian homes. Cleaning removes the immediate hazard and restores airflow.
Safety warning: If you suspect a blocked or water-filled duct on a gas dryer, stop using the appliance immediately. A blocked vent can force exhaust, including carbon monoxide, back into the living space. Do not restart the dryer until the vent is inspected and confirmed clear.
Reduced dryer efficiency follows naturally: a partially blocked, wet duct forces the dryer to run longer cycles, consuming more energy and wearing out heating elements faster.
How to inspect your dryer vent: a step-by-step checklist
Safety comes first. Before touching anything:
- Unplug electric dryers from the wall outlet. For gas dryers, shut off the gas supply valve behind the unit and ventilate the room before proceeding.
- Put on work gloves and grab a flashlight.
Exterior checks:
- Go outside and locate the exterior vent hood. Watch it during a dryer cycle (have someone run the dryer briefly) — the flapper should open visibly and you should feel warm airflow.
- With the dryer off, confirm the flapper closes tightly. Clear any leaves, snow, insect nests, or debris blocking the hood opening.
- Note any water dripping from the exterior hood or staining on the wall below it.
Interior checks:
- Pull the dryer away from the wall. Examine the flexible hose connecting the dryer to the wall duct — feel for sagging sections or pooled water inside.
- Inspect the dryer outlet (the round opening on the back of the machine) for damp or clumped lint.
- Check the hose for kinks, tears, or disconnected sections.
- Trace any visible duct runs through unheated spaces (basement, crawl space, garage) and note whether they are insulated.
Collect this information for a pro quote:
- Approximate total duct length, number of elbows, duct material (flexible vinyl, flexible foil, rigid metal), and whether the run passes through any unheated spaces.
Pro Tip: The exterior flapper test is the single fastest diagnostic. If the flapper barely moves or stays shut during a cycle, you have a blockage or a stuck flapper — and that alone explains most condensation complaints.
How to remove water and clean the duct yourself
The best-practice cleaning sequence starts with isolating power or gas, then removing standing water before brushing, so you are not pushing wet lint deeper into the duct.
Tools you need:
- Wet/dry vacuum
- Flexible dryer-vent brush kit with extension rods (sized for a 4" duct)
- Foil tape (not cloth duct tape, which degrades with heat)
- Flashlight and screwdriver
- Work gloves
Step-by-step:
- Isolate power or gas as described in the inspection checklist above.
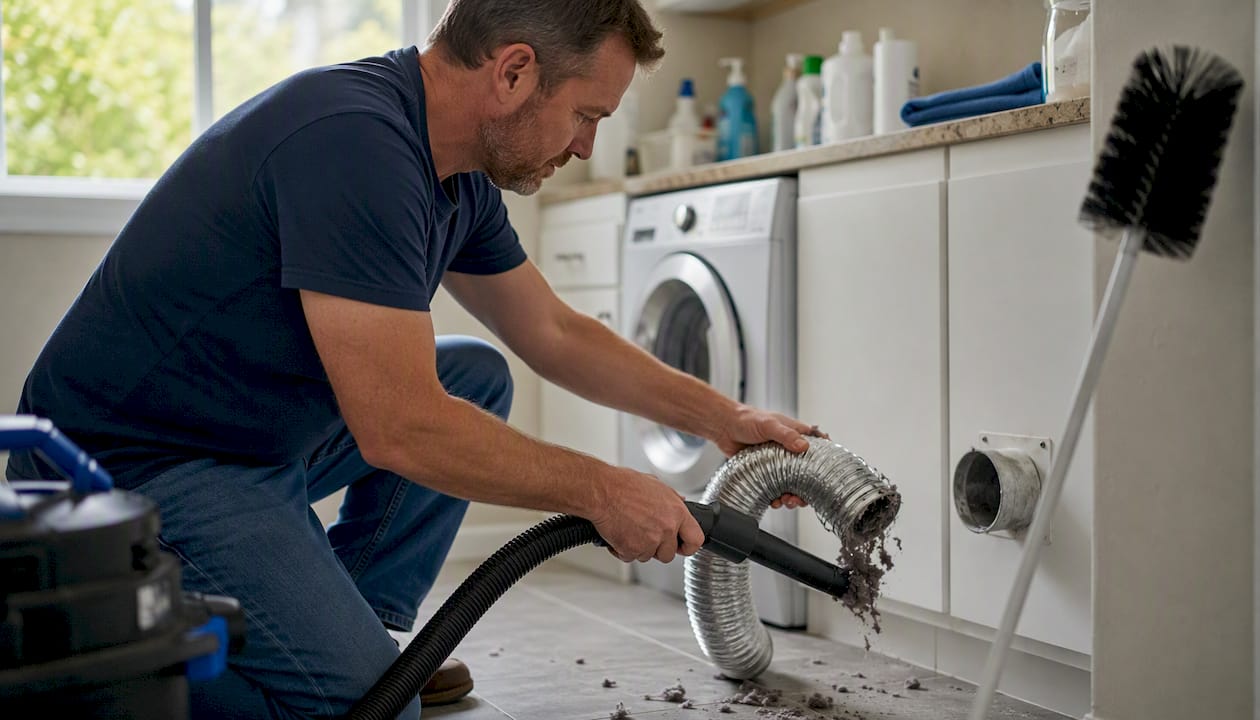
- Vacuum out standing water from the accessible hose section using the wet/dry vac.
- Disconnect the flexible hose from the wall duct connection (usually a clamp or friction fit). Set it aside.
- Brush the wall duct from the interior end using the flexible brush and extension rods, working toward the exterior. Vacuum debris as you go.
- Go outside and brush from the exterior hood inward, then vacuum again from inside.
- Clear the exterior hood of any remaining lint or debris. Test that the flapper swings freely.
- Reconnect the hose using foil tape at the joints. Do not use cloth duct tape.
- Run a short test cycle (10 minutes) and confirm warm airflow at the exterior hood and that the flapper opens fully.
When to stop and call a professional:
- The clog is beyond your brush reach or in a concealed wall section.
- Water returns within a few cycles after cleaning.
- You find mould inside the duct or on surrounding framing.
- The duct runs through walls or ceilings with no accessible clean-out points.
- Any gas-dryer exhaust concern — smell, backflow, or uncertain duct integrity.
Permanent fixes that stop condensation from coming back
Cleaning solves the immediate problem. These upgrades prevent it from recurring.
Replace plastic or vinyl flex duct with rigid smooth metal. Flexible plastic or vinyl ducting sags and creates condensate collection points; rigid or semi-rigid smooth metal 4" ducting maintains consistent airflow and gives lint nowhere to cling. Rigid metal is the standard recommended by both manufacturers and Canadian building guidance.
Correct the slope and straighten the run. Canadian building guidance calls for a slight continuous slope toward the exterior so condensate drains out rather than pooling inside walls. Reduce the number of elbows wherever possible — each 90-degree elbow adds roughly the equivalent of several feet to the effective run length.
- Keep the total run as short and straight as the layout allows.
- Avoid 90-degree elbows where a 45-degree elbow or a gentle curve will do.
- Secure the duct so it cannot sag between supports.
Insulate duct runs through cold spaces. In Canada's colder regions, an uninsulated duct running through an unheated attic, garage, or crawl space will cause recurring condensation even after a thorough cleaning. Wrapping the duct with pipe insulation or duct wrap rated for dryer exhaust temperatures keeps the exhaust above the dew point through the run.
Upgrade the exterior hood. Replace any damaged, stuck, or undersized hood with a correctly sized louvred or flapper-style cap. Confirm it closes tightly against wind and precipitation, and that no screen is blocking the opening (screens trap lint and restrict airflow).
When should you hire a professional dryer-vent cleaner?
Some situations are genuinely beyond what a homeowner can safely or effectively handle.
Call a pro when:
- The duct runs through walls or ceilings with no accessible clean-out points.
- Water returns after you have already cleaned the vent.
- You find visible mould inside the duct or on surrounding framing.
- The duct is sagging inside a concealed cavity.
- You have a gas dryer and any exhaust concern — smell, suspected backflow, or uncertain duct condition.
- The duct material is plastic or vinyl and needs replacement with rigid metal.
What a reputable professional does:
A certified technician performs a visual and video inspection to locate in-wall disconnects, hidden low spots, and damage that a brush cannot reach. They wet-vac standing water, then use powered rotary brushes from both the interior and exterior ends to clear compacted lint. Where needed, they repair or replace short duct segments, add insulation, and replace the exterior hood. The job ends with a final airflow test and written documentation of what was found and what was done.
Questions to ask before booking:
- Are your technicians INCV-certified?
- Do you carry liability insurance?
- Is the estimate fixed-price with no hidden add-ons?
- Will you provide before-and-after photos or video?
- What is your satisfaction guarantee?
Pro Tip: Ask specifically whether the technician will inspect from both ends of the duct. A single-end brush-only clean misses in-wall disconnects and hidden low spots — the exact problems that cause water to return.
How Clean Vents inspects and cleans dryer vents
Clean Vents follows a structured methodology on every dryer-vent job. The process starts with a visual and video inspection to identify the water location, duct condition, and any in-wall issues before a brush touches anything. Standing water is removed with a wet/dry vacuum. Powered rotary brushes then clean from both the interior and exterior ends, clearing compacted lint and debris throughout the full run. Where accessible, technicians repair or replace damaged connections, add insulation on cold-space runs, and replace faulty exterior hoods.
Every technician is INCV-certified, and pricing is flat-rate with no surprise charges after the job. Clients receive photo and video documentation of the duct condition before and after cleaning, plus a written maintenance recommendation covering cleaning frequency and any upgrades worth considering.
What clients receive: a pre-inspection report, full duct cleaning from both ends, minor hood and connection repairs, a post-cleaning airflow test, and a written recommendation for next steps — all backed by a satisfaction guarantee.
For broader indoor air quality concerns, Clean Vents also offers air duct cleaning that complements dryer-vent work when condensation has spread moisture through connected ductwork.
The part most guides get wrong about dryer vent water
Most online advice treats water in a dryer vent as a single problem with a single fix: clean the lint, done. That framing misses the structural issue almost every time.
Cleaning removes the symptom. It does not fix a duct that slopes the wrong way, runs 10 metres through an unheated attic, or terminates at a hood that barely opens. In Canadian climates, those structural problems mean the condensation returns within weeks of cleaning — and homeowners end up convinced the cleaning "didn't work" when the real issue was never addressed.
The sequence that actually works: clean first to restore airflow, then inspect the full run for slope, material, insulation, and hood condition, then fix what the inspection reveals. Skipping straight to cleaning without the structural review is the single most common reason dryer vent water problems recur.
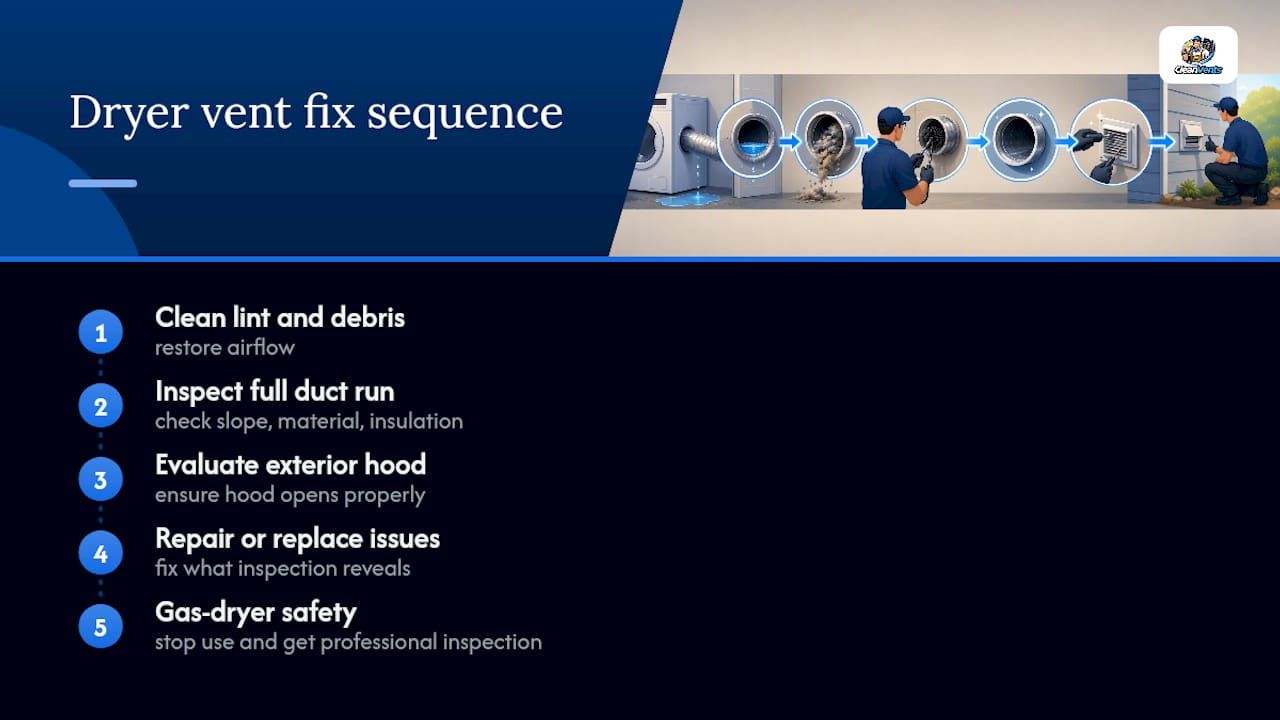
There is also a tendency to underestimate the gas-dryer risk. Carbon monoxide is odourless and accumulates fast in a closed laundry room. If there is any doubt about duct integrity on a gas dryer — water, blockage, or a disconnected section — the right call is to stop using the appliance and get a professional inspection before the next load. That is not overcaution; it is the correct risk assessment.
Professional dryer-vent cleaning in Laval and surrounding areas
Recurring condensation, water dripping from the exterior hood, or a dryer that takes two cycles to dry a single load — these are the situations where a professional inspection pays for itself. Clean Vents provides dryer vent cleaning with INCV-certified technicians, flat-rate pricing, and a satisfaction guarantee. No surprise charges, no single-end brush-only clean — a full inspection and cleaning from both ends, with documentation you can keep.

If condensation has spread beyond the dryer duct into connected ductwork, the air duct cleaning service covers the full system. Book a quote online or by phone and get a written scope of work before any technician arrives at your door.
Sources
- Why does my dryer vent have water in it
- Clothes Dryer Exhaust Vent Installation
- Dryer condensation issues: a troubleshooting guide
- Why Is My Dryer Vent Dripping Water? 3 Things You Need To Know
FAQ
What happens if water gets into a dryer vent?
Water in a dryer vent causes lint to compact into a dense, slow-drying clog that restricts airflow, raises fire risk, promotes mould growth, and forces the dryer to run longer cycles. On gas dryers, a blocked vent can cause carbon monoxide to back up into the living space.
Why would a dryer vent be full of water?
The most common reasons are a lint clog slowing airflow, a duct that slopes back toward the dryer instead of toward the exterior, uninsulated ductwork running through a cold space, or a damaged exterior hood letting rain in. Any of these causes hot, humid exhaust to cool and condense inside the duct rather than exit the house.
How do you get water out of a dryer vent?
Disconnect the dryer, use a wet/dry vacuum to remove standing water from the accessible hose section, then brush and vacuum the full duct run from both ends using a flexible vent-brush kit. Clear the exterior hood, reattach the hose with foil tape, and run a short test cycle to confirm airflow is restored.
Is it normal to have condensation in a dryer vent?
No. Some minor moisture at the very end of the duct near the exterior is possible in cold weather, but condensation pooling inside the duct or dripping from the exterior hood indicates a ventilation problem — typically a clog, incorrect slope, uninsulated cold-space run, or a faulty exterior flapper — that needs to be corrected.