
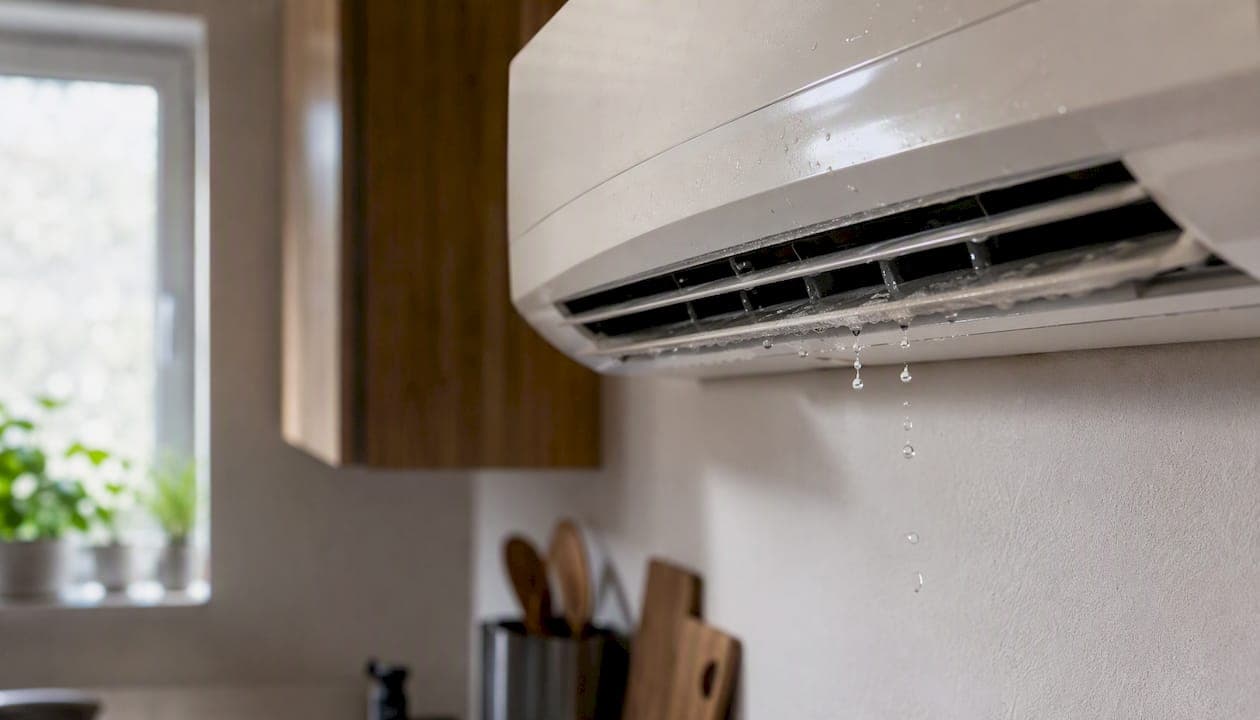
Most mini splits that drip inside have a drainage problem. The condensate drain line is clogged, the drain pan is overflowing, or both. Before you read another word, do two things: if water is anywhere near an electrical outlet, switch, or the unit's wiring, cut power at the breaker right now. Then check the washable filter and the outdoor drain exit. Those two items resolve a surprising share of leaks.
Carrier and Bryant both confirm that a clogged condensate drain line, dirty air filter, or damaged drain pan are the most common causes of indoor leaks and the safest first checks for homeowners. If you're comfortable using a wet/dry vac, attach it to the outdoor drain discharge for 30–60 seconds. That alone clears many blockages.
- Power off first if water is near any electrical component.
- Check the filter — a clogged filter restricts airflow, causes the coil to ice over, and creates excess meltwater.
- Inspect the outdoor drain exit — a blocked discharge is often the entire problem.
- Try a wet/dry vac on the outdoor drain discharge before calling anyone.
Pro Tip: Keep a photo of the drip location and the drain exit before you touch anything. That photo speeds up every technician visit and supports any warranty claim.
Key takeaways
A clogged condensate drain line is the most common cause of a mini split dripping water indoors, and clearing it with a wet/dry vac is the safest first DIY step before calling a technician.
| Point | Details |
|---|---|
| Cut power if water reaches wiring | Turn off the breaker immediately — water near electrical components is a safety emergency. |
| Check filter and drain exit first | A dirty filter or blocked outdoor discharge causes most indoor drips and takes minutes to inspect. |
| Dripping in heat mode needs urgent attention | Water while heating signals a mechanical fault; stop using the unit and call a certified technician. |
| Clean filters every 4–6 weeks | Manufacturer guidance recommends this cadence to prevent airflow restriction, coil freezing, and leaks. |
| Clean Vents for professional service | INCV-certified technicians in Laval handle drain clearing, coil cleaning, and full mini-split inspections. |
Table of Contents
- Common causes of mini split dripping water and what you can do right now
- How to find exactly where the water is coming from
- How to prevent future leaks with a simple maintenance schedule
- Why dripping in heating mode is a red flag in Canada
- Typical repair costs and timelines in Canada
- What technicians actually find when they arrive
- Clean Vents keeps your mini split dry and your air clean
- Sources
Common causes of mini split dripping water and what you can do right now
1. Clogged condensate drain line
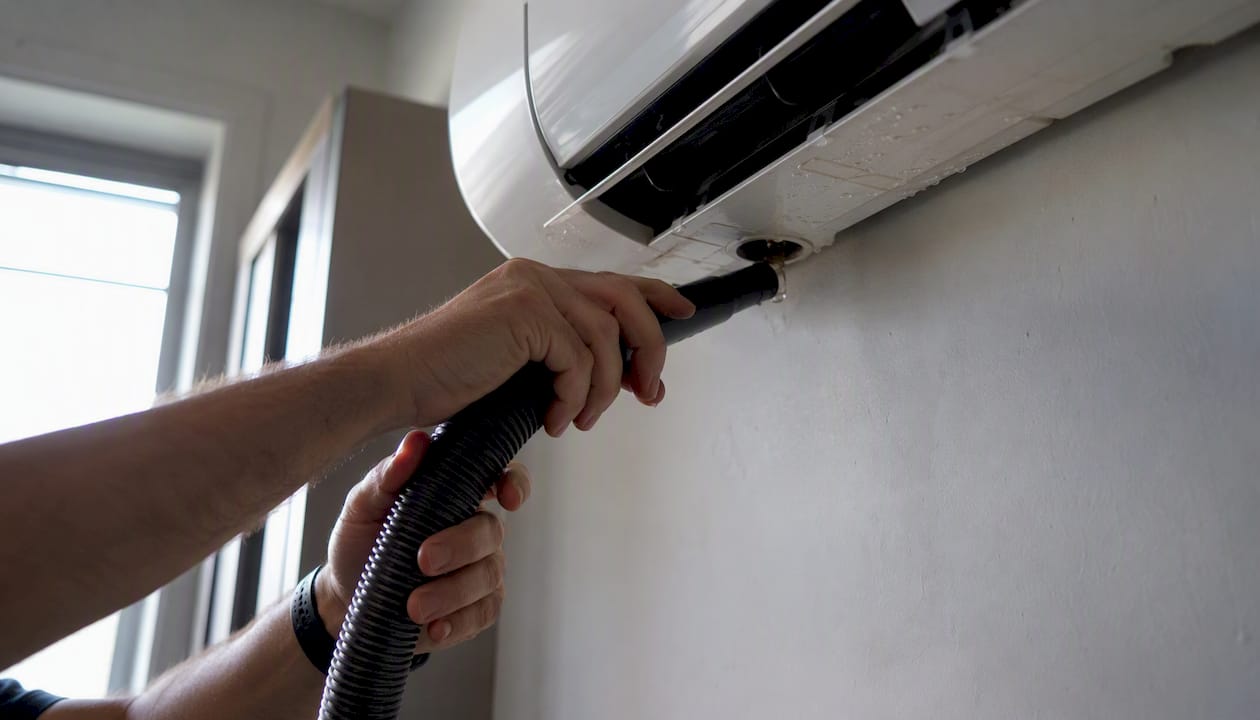
The drain line carries condensation from the indoor unit to the outside. When it blocks with algae, dust, or debris, water backs up into the drain pan and spills into your wall or floor. This is the single most frequent cause of a mini split water leak.
DIY steps:
- Locate the outdoor drain discharge (usually a small plastic tube exiting the wall).
- Attach a wet/dry vac to the discharge end and run it for 30–60 seconds.
- If that clears it, flush the line with a mild white-vinegar solution (equal parts vinegar and water) to slow biological regrowth.
- Do not use a high-pressure snake or compressed air — you risk cracking the drain pan or pushing debris deeper.
Call a pro if: water backs up immediately after clearing, or you cannot locate the discharge point.
2. Dirty or blocked air filter
A filter clogged with dust cuts airflow across the evaporator coil. The coil gets too cold, ice forms, and when the ice melts it overwhelms the drain pan. Carrier Canada recommends cleaning filters every 4–6 weeks and scheduling annual professional maintenance to prevent exactly this chain of events.
DIY steps:
- Lift the front panel and slide out the washable filter.
- Rinse under lukewarm water, let it dry fully, and reinstall.
- While the filter is out, shine a flashlight at the coil. If you see ice, turn the unit off and let it defrost completely before restarting.
Call a pro if: the coil is heavily iced and the filter was already clean — that points to a refrigerant issue.
3. Frozen evaporator coil
Ice on the coil produces far more meltwater than the drain pan can handle. Restricted airflow (dirty filter, blocked return) is the usual trigger, but low refrigerant causes the same symptom. Debris restricting airflow and causing freezing is one of the most common findings technicians report on site, according to Contracting Business.
DIY steps:
- Turn the unit off and set it to fan-only mode for 1–2 hours to defrost.
- Clean the filter and check that no furniture or curtains block the return air path.
- Restart and monitor for re-icing within 30 minutes.
Call a pro if: the coil refreezes after defrosting with a clean filter — refrigerant diagnosis requires a certified technician.
4. Unit not level or improperly mounted
Mini splits need a slight backward tilt (toward the wall) so condensate drains toward the outlet rather than pooling at the front. A unit that has shifted or was installed without checking level will drip from the front of the casing.
DIY steps:
- Hold a small spirit level against the bottom of the indoor unit.
- If it reads off-level, the mounting bracket may need adjustment — this is a two-person job and requires re-securing the bracket to wall studs.
Call a pro if: the bracket is anchored in drywall only, or the unit is heavy and awkward to reposition safely.
5. Damaged or cracked drain pan
The drain pan sits beneath the evaporator coil and catches all condensation. Cracks, warping from age, or mould-related deterioration let water bypass the drain entirely. You can often spot a cracked pan by removing the front cover and shining a light underneath the coil.
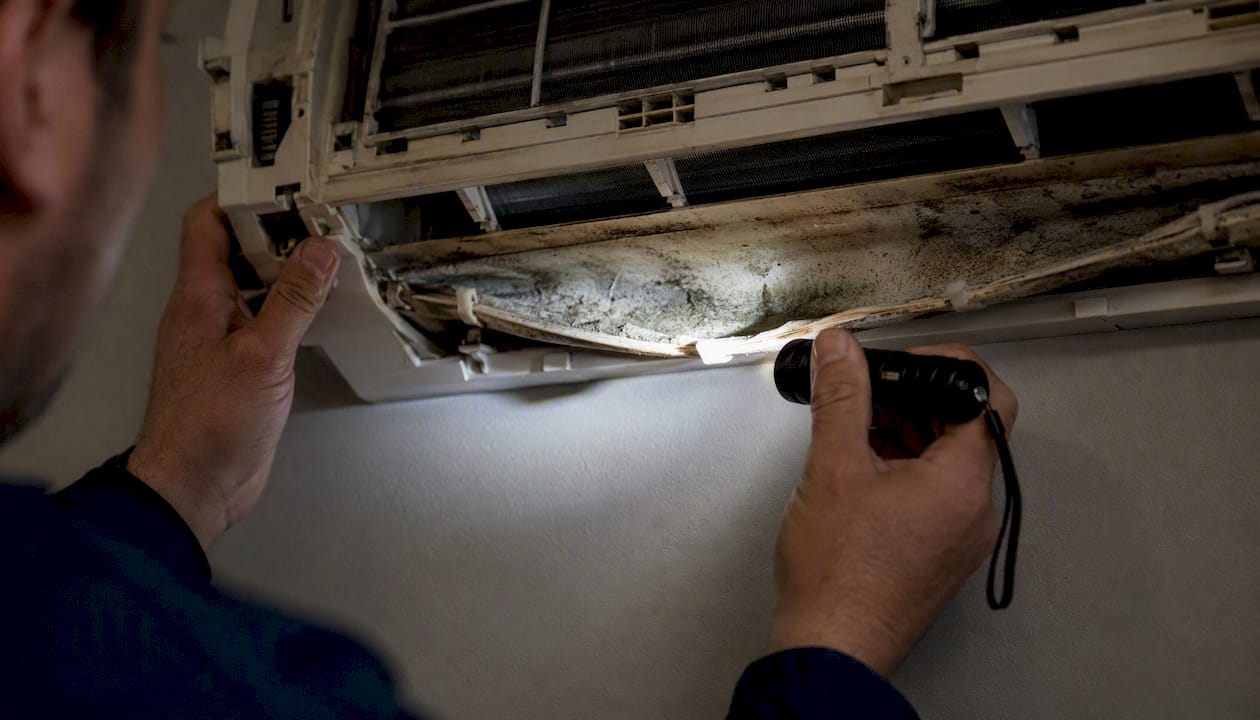
Call a pro: drain pan replacement almost always requires shroud removal and partial disassembly. NADCA's mini-split cleaning fundamentals warn that thin coil fins and plastic tabs break easily during disassembly — this is not a job to improvise.
6. Condensate pump failure
If your indoor unit sits above the natural drain slope (common in basements or interior rooms), a condensate pump lifts water to the discharge point. When the pump fails, water has nowhere to go.
DIY steps:
- Confirm the pump has power and listen for it cycling when the unit runs.
- Check the pump's float switch — debris can jam it in the off position.
- Note the model number and any error lights before calling for service.
Call a pro if: the pump runs but water still backs up, or the pump is completely silent with power confirmed.
7. Low refrigerant or refrigerant leak
Low refrigerant causes the coil to run colder than designed, leading to ice formation and the same meltwater overflow described above. You may also notice the unit not cooling well despite running continuously. Refrigerant handling is regulated in Canada and requires a certified technician — this is not a DIY repair.
Warning: if you smell something chemical near the unit or see oily residue on the coil or line set, stop using the unit and call a professional immediately.
How to find exactly where the water is coming from
Work through this checklist in order. Safety comes first.
- Cut power at the breaker if water is near any wiring, outlet, or the unit's electrical connections.
- Gather tools: spirit level, flashlight, wet/dry vac, rubber gloves, and a few old towels.
- Trace the drip path. Is water coming from the front of the casing (likely a level or pan issue), from the wall penetration (drain line or pipe insulation), or from underneath the unit (drain pan overflow)?
- Check for ice and smell. Visible ice on the coil or a musty odour from the unit both tell you something specific — ice means airflow or refrigerant trouble; mould smell means the drain line or pan needs cleaning.
- Remove and inspect the filter. Rinse it if dirty, let it dry, and reinstall.
- Locate and test the condensate drain. Find the outdoor discharge, attach the wet/dry vac, and run it briefly. Note whether water flows freely or backs up.
- Check the condensate pump (if present). Confirm power, listen for operation, and check the float switch.
- Photograph everything — the drip location, any ice, the drain exit, and the unit's model/serial label. These photos save time and money on a technician visit and support warranty claims.
How to prevent future leaks with a simple maintenance schedule
Most mini split leaks are preventable. The maintenance cadence is straightforward; the mistake most homeowners make is skipping it entirely because the unit seems to be working fine.
Technicians consistently report that homeowners assume mini splits are maintenance-free. They are not. Blower wheels and evaporator coils collect dust and mould steadily, and once airflow is restricted enough, freezing and leaks follow.
Monthly
- Remove and rinse the washable filter under lukewarm water.
- Wipe the front panel and check the outdoor drain discharge is clear of leaves or debris.
- Listen for unusual sounds (gurgling, dripping, rattling) during operation.
At the start of each cooling season
- Run the unit briefly and watch for any dripping within the first 20 minutes.
- Check that the unit is still level using a spirit level.
- Flush the condensate drain line with a mild vinegar solution.
- Test the condensate pump (if installed) by pouring a small amount of water into the pump reservoir and confirming it evacuates.
Annually (professional service)
- Deep coil and blower cleaning — requires shroud removal and a containment bib kit to protect your walls. NADCA guidance documents why this disassembly step is necessary and why thin fins are easily damaged without the right tools.
- Drain pan inspection and cleaning.
- Refrigerant level check.
- Condensate pump service or replacement if the unit is above grade.
- Full system performance check.
Pro Tip: Pour a small amount of white vinegar into the drain line access point every spring. It slows algae and mould growth in the line between professional visits. For persistent biological growth, a technician can apply a fungistat treatment during the annual service.
Considering an upgrade or replacement? NRCan's Canada Greener Homes initiative lists federal programs that may offset costs for eligible heat-pump installations and upgrades.
Why dripping in heating mode is a red flag in Canada
Trane's troubleshooting guidance is direct on this point: dripping during heat mode warrants immediate professional inspection to prevent electrical hazards or system damage.
During cooling operation, condensation on the evaporator coil is expected — the drain system exists to handle it. In heating mode, the refrigerant cycle reverses and the indoor coil should be warm and dry. Water appearing indoors while heating points to one of these faults:
- A clogged internal drain that has backed up completely.
- Failed defrost-water routing (the outdoor unit's defrost cycle produces water that should drain outside, not inside).
- A cracked condensate pipe or fitting.
- A condensate pump that has failed with water now backing up into the unit.
Immediate steps if your unit drips in heat mode:
- Turn the unit off immediately.
- If the leak is near any wiring or electrical connections, cut power at the breaker.
- Place towels and a container to contain water and protect flooring or walls.
- Photograph the leak location and the unit's model label.
- Call a certified HVAC technician — do not restart the unit until it has been inspected.
In Canadian winters, a heating-mode leak left unaddressed can cause wall moisture damage, mould growth behind drywall, and in severe cases, electrical faults in a system running under load. The risk is higher than a summer cooling-mode drip.
Typical repair costs and timelines in Canada
Costs vary by region, access difficulty, and whether parts are under warranty. The figures below are ballpark ranges based on consumer guidance from BobVila and general Canadian labour context — always get a written quote before authorising work.
A few factors push costs toward the higher end: units mounted in tight spaces or high on walls, multi-zone systems with several indoor heads, older units where parts are harder to source, and any repair that requires drywall access to reach the drain line.
Before booking any service:
- Ask whether the technician holds INCV certification or an equivalent provincial credential.
- Request a written diagnostic quote before any work begins.
- Confirm whether the repair is covered under the manufacturer's warranty — many drain pan and pump failures fall within the warranty period on newer units.
- Check whether your home insurance covers water damage from a mechanical HVAC failure.
What technicians actually find when they arrive
The most common finding on a service call for a dripping mini split is not a broken part. It's a drain line packed with a dark, slimy algae mat that built up over two or three seasons of skipped maintenance. The second most common finding is a filter that hasn't been cleaned in over a year, with the coil behind it partially iced.
What helps a technician work faster: a photo of the drip location taken before you touched anything, the unit's model and serial number written down, and a clear description of when the dripping started and whether it happens in cooling mode, heating mode, or both. That information alone can cut 20–30 minutes off a diagnostic visit.
Access matters too. Units mounted above kitchen cabinets, in tight alcoves, or with the drain line running through finished walls take longer to service and cost more. If you know the drain line route, point it out. If the unit has a condensate pump, show the technician where it is and whether it has been making noise.
Clean Vents keeps your mini split dry and your air clean
Water dripping from a wall-mounted AC is one of the clearest signs the unit needs professional attention, not just a quick wipe-down. Clean Vents provides wall AC and mini-split cleaning for residential and commercial properties in Laval and surrounding areas, with INCV-certified technicians who handle the full service: drain-line clearing, coil and blower cleaning with containment bib kits, condensate pump checks, drain pan inspection, and a written diagnostic report after every visit.
Flat-rate, upfront pricing means you know the cost before anyone touches the unit. No surprise add-ons, no vague estimates. If the inspection turns up a refrigerant issue or a cracked pan that needs a specialist, you'll get a clear referral rather than a bill for work that wasn't done.
Book a wall AC cleaning inspection with Clean Vents and stop the drip before it becomes a mould problem.
Sources
These are the most useful pages to consult for deeper guidance, warranty support, or to bring to a technician visit:
- Trane — Mini split leaking water
- Mini Split Leaking Water? Diagnosis & DIY Repair Tips - Carrier
- How to properly service mini-split heat pumps — Contracting Business
- MiniSplit cleaning fundamentals — NADCA (2024 PDF)
- Mini split leaking water — BobVila
- Canada Greener Homes grant — NRCan